How to install Himap
|
One.The download HiMap Software Development Kit v2.1 version: HiMap_sdk_v2_1.
Two.Install HiMap run, you need to HiMap.Carto.dll,
HiMap.Driver.dll, HiMap.Geometry.dll,
HiMap.MapControls.dll,HiMap.Style.dll,HiMap.CoordinateSystem, HiMap.Base ,
KMGisLib
dll Copied to the directory of your application where mobile devices, such as:\ProgramFiles
\
DeviceApplication1
"。You can use Microsoft ActiveSync to copy the file or memory card。
Three.VS2005 automatic deployment KMGisLib.dll:
1. [Solution Explorer] window [DeviceApplication1] item, click the right mouse button and select [Add] ->
[Existing entries]。
2.Find"himap_v2_for_netcf"Unzip the file directory, select [file type]"Executable file (*. exe;
*. dll *. ocx)"。
3.Select "KMGisLib.dll" Files and"gdalce.dll",Click [Add] button。
4.In to select "KMGisLib.dll" files and gdalce.dll [Solution Explorer] window [Properties] window, set
File attributes [Copy to Output Directory: newer copy] and [build action: content]。
5.Deploy your program。
One.
Creating a Project:MyHimap
1. Please the himap_v2_for_net_cf.zip extract the files to a local disk directory, you will see the following files:
HiMap.Base.dll, HiMap.Carto.dll, HiMap.CoordinateSystem.dll, HiMap.Driver.dll,
HiMap.Geometry.dll, HiMap.MapControls.dll, HiMap.Style.dll, KMGisLib.dll.
2. Start the Microsoft Visual Studio 2005 (hereinafter referred to as VS2005) in the [File] menu, select [New]
->[Project]。
3. [New Project] window, select [Visual C #]->[Smart devices]->[Windows Mobile 6 Professional]
->[Device Application], Input in the [Name] column"myHiMap",->[ok]
Two. Add HImap reference for the project
1. [Solution Explorer] Right-click the [reference] select [Add Reference].In [add reference]
In the window, select the [Browse] tab, select one of the following seven files: HiMap.Carto.dll,
HiMap.Driver.dll,
HiMap.Geometry.dll, HiMap.MapControls.dll,
HiMap.Style.dll,HiMap.CoordinateSystem
.dll, HiMap.Base.dll,Click [OK] button。
Three.
NET Compact Framework components added to the toolbox will Himap.
1. Right-click on the [Tools] window in the space, in the pop-up menu, select [option]。
2. [Choose Toolbox Items] window, select [NET Framework Components] tab, click [Browse] button。
3. In the pop-up [Open] window, find"HiMap.MapControls.dll"File, and click the [Open] button。
4. [Choose Toolbox Items] window, click [OK]。
5. After adding the files successfully,"MapControl"Will appear in the [Toolbox]。
Four.
HiMap the MapControl add controls to the form and write basic method of code。
1. Found in [Toolbox] window "MapControl" Controls,drag "MapControl" control to "Form1.cs [Design]
window。
2.The Form1.cs code for form,Code in add "namespace myHiMap" above the of "using
HiMap.Carto" and a
using HiMap.Driver ".
|
using HiMap.Carto;
using HiMap.Driver;
|
3. Add "Form1_Load" event, and enter the following code to Form1.
|
//Define a map object
Map _map;
private void Form1_Load(object sender, EventArgs e)
{
_map = new Map("test");
mapControl1.Map = _map;
// This Xml file is map drawing file
mapControl1.Map.FromKmd("\\Storage Card\\nyc.xml");
mapControl1.MapRefresh();
HiMap.MapControls.Tools.ITool pTool = new
HiMap.MapControls.Tools.ToolPan();
pTool.OnCreate(this.mapControl1);
this.mapControl1.CurTool = pTool;
}
|
4. This example uses Microsoft ActiveSync (4.5.0 version) connectivity tools to connect your PC to the Windows
Mobile 5.0 for Pocket PC or Windows Mobile 6 Professional mobile devices。
5. Right-click on [solve the Solution Explorer window engineering [myHiMap, in the pop-up menu, select [deployment]。
6. After a successful deployment, the himap_v2_for_net_cf.zip file KMGisLib.dll file is copied to the mobile "
device\Program Files\myhimap"。Or, use the VS2005 deployment function automatically deploy to the program directory,
Five. Copy the map files to a mobile device, and run the project
1. Please file nyc.xml nyc_mainroads.shp nyc_mainroads.shx nyc_mainroads.dbf copied to the mobile device directory "
\ Storage Card" ,You can use Microsoft ActiveSync synchronization tools or memory card to copy。
2. Click on the the VS2005 [start debugging (F5)] button.
3. Congratulations to you!The your first HiMap project runs successfully.
1. HiMap.Base.dll
2. HiMap.Carto.dll
3.
HiMap.CoordinateSystem.dll
4. HiMap.Driver.dll
5.HiMap.Geometry.dll
6.HiMap.MapControls.dll
7.HiMap.Style.dll

1.Summary
This article summarizes the conversion by map coordinates to screen coordinates。
2.Preview
By map coordinates to screen coordinates.
//Setting the value of a map coordinate points
|
double dMapX = 123.4000;
double dMapY = 40.3200;
//Map coordinates point to convert the screen coordinates of points
System.Drawing.Point screenPoint
= mapControl1.MapToScreen(dMapX, dMapY);
//Display the results
MessageBox.Show("Screen x:" +
screenPoint.X.ToString() + "\r\n" + "Screen y:" +
screenPoint.
Y.ToString());
|
1.Summary
This article focuses on how to screen coordinates into map coordinates.
2.Preview
|
//Defining the screen coordinates of points
int iScreenX = 100;
int iScreenY = 200;
//Conversion from screen coordinates to map coordinates
IPoint mapPoint =
mapControl1.PointToMapPoint(iScreenX, iScreenY);
//Display the results
MessageBox.Show("map x:"+
mapPoint.X.ToString() + "\r\n" + "map y:" + mapPoint.Y.
ToString());
|
1.Case:
1.According to latitude and longitude position draw.
|
//Define a Brush object
Brush brush = new SolidBrush(Color.Yellow);
//Defined Pen, color and size
Pen pen = new Pen(Color.Blue, 2);
//Plot points
mapControl.DrawPoint(pen, brush, 123.111, 41.111,
2);
|
2. According to the screen coordinates to draw.
|
//Define a rectangle Rectangle
Rectangle rectangle = new
Rectangle(10, 20, 5, 5);
//Plot points
mapControl.DrawPoint(new
Pen(Color.Red), new SolidBrush(Color.Blue), rectangle);
|
2.Remark
Drawn prerequisite: MapControl control must contain a layer。
1.Case:
|
//Defined Pen
Pen pen = new Pen(Color.Blue, 2);
//Define some point in screen coordinates
Point[] arrPoint = new Point[5];
arrPoint[0].X = 40;
arrPoint[0].Y = 30;
arrPoint[1].X = 100;
arrPoint[1].Y = 30;
arrPoint[2].X = 120;
arrPoint[2].Y = 80;
arrPoint[3].X = 50;
arrPoint[3].Y = 70;
arrPoint[4].X = 40;
arrPoint[4].Y = 90;
//Drawing lines
mapControl.DrawLine(pen, arrPoint);
|
3 function can draw a temporary segment.
1. Set of points on the screen draw.
|
public void DrawLine(Pen pen, Point[] pts);
|
2. Collection drawn map point.
|
public void DrawLine(Pen pen, IPoint[] pts);
|
3. Screen coordinates of the starting point and end point draw.
|
public void DrawLine(Pen pen, Point pt1, Point pt2);
|
1.Case:
|
//Defined Pen
Pen pen = new Pen(Color.Blue, 2);
//Defined Brush
Brush brush = new SolidBrush(Color.Yellow);
//Polygon defined screen coordinates of points
Point[] arrPoint = new Point[4];
arrPoint[0].X = 40;
arrPoint[0].Y = 30;
arrPoint[1].X = 100;
arrPoint[1].Y = 30;
arrPoint[2].X = 120;
arrPoint[2].Y = 80;
arrPoint[3].X = 50;
arrPoint[3].Y = 70;
//Draw a polygon
mapControl.DrawPolygon(pen,brush,arrPoint);
|
2.Remark:
Polygon consists of more than one point, so you must first create a set of points。
1.Case:
|
//Defined Pen
Pen pen = new Pen(Color.Blue, 2);
//Draw ellipse
mapControl.DrawEllipse(pen, new Rectangle(30,
40, 120, 125));
|
2.Remark:
Two draw an ellipse.
1. Using the screen coordinates of the rectangle to draw.
|
public void DrawEllipse(Pen pen, Rectangle rect);
|
2. Using the screen coordinates of the left value of x, y values, the width and height to draw.
|
public void DrawEllipse(Pen pen, int x, int y, int width, int
height);
|
1.Summary
Geodatabase API can be used in a variety of ways to query the object in the Geodatabase. The use IQueryFilter,
and ISpatialFilter object can set the query。This paper briefly discusses how to use QueryFilters the query geodatabse
object, such as a table or feature。
2.Preview
3.Detail
Use IQueryFilter interface to query one the Geodatabase Feature Class.
• Query code.
|
IFeature ift = null;
IFeatureCursor ifc;
IFeatureClass cls;
//Define the query field
string strSearchField = "";
//The value of the definition query
string strQueryValue = "PAL";
string strQueryResult = "";
for (int i = 0; i < this._mapControl.Map.LayerCount; i++)
{
IFeatureLayer featureLayer =
(IFeatureLayer)this._mapControl.Map.GetLayer(i);
switch (featureLayer.GeometryType)
{
case GeometryType.Polyline:
strSearchField = "HWYNAME";
break;
case GeometryType.Polygon:
strSearchField = "NAME";
break;
case GeometryType.Point:
strSearchField = "ObjectID";
break;
default:
strSearchField = "ObjectID";
break;
}
// get a data
cls = (HiMap.Carto.IFeatureClass)featureLayer.Class;
//Fuzzy query, the query "HWYNAME" field [char data type] contains 'PAL%' value
string strTemp = strSearchField + " like '" + strQueryValue + "%'";
//Query data
ifc = CSearch.GetFeatureCursor(_mapControl, i, strTemp);
//Navigate to the data
ift = ifc.Next();
if (ift != null)
{
while (ift != null)
{
strQueryResult +=
ift.GetValue(cls.Fields.FindField(strSearchField)).ToString();
strQueryResult += "\r\n";
ift = ifc.Next();
}
}
}
MessageBox.Show(strQueryResult);
|
• Query function subfunctions.
|
//Subfunction, query a data pointer
//Query a data pointer
public static IFeatureCursor GetFeatureCursor(HiMap.MapControls.MapControl
map, int
varIndex, string condition)
{
//Layer object
IFeatureLayer lyr = (IFeatureLayer)map.Map.GetLayer(varIndex);
IFeatureClass fcls = (IFeatureClass)lyr.Class;
//Create a query filter
IQueryFilter qf = new QueryFilterClass();
//Set the search criteria
qf.WhereClause = new StringBuilder(condition);
//Inquiry
IFeatureCursor cur = fcls.Search(qf);
//Returns a pointer
return cur;
}
|
1.Summary
This article will show you how to use HiMap click query。
2.Preview
3.Detail
Create the inherited HiMap.MapControls.Tools.ToolClass ToolInfo Class object to be queried。
|
using System;
using System.Collections.Generic;
using System.Text;
using HiMap.Carto;
using HiMap.Driver;
using HiMap.Geometry;
using HiMap.MapControls;
using HiMap.MapControls.Tools;
using HiMap.Style;
using System.Windows.Forms;
namespace NaviSoftHiMap
{
public class ToolInfoClass : HiMap.MapControls.Tools.ToolClass
{
//Rewrite events
protected override void OnMouseDown(object sender,
System.Windows.Forms.
MouseEventArgse)
{
//Create a space query object
HiMap.Carto.ISpatialFilter sf = new
HiMap.Carto.SpatialFilterClass();
//Set the query conditions (range)
sf.Buffer = double.Parse(Settings.POISearchRadius);
sf.QType = QueryType.Pixel;
IPoint point = new PointClass();
point.X = e.X;
point.Y = e.Y;
//Set the center point of the query
sf.Geometry = point;
//Define the data set
HiMap.Carto.IFeatureClass cls;
//Defined data pointer
HiMap.Carto.IFeatureCursor fc;
FormList frmList = new FormList();
//Cycle Layer
for (int i = 0; i < this.Map.Map.LayerCount; i++)
{
//Get all the data
cls =
(HiMap.Carto.IFeatureClass)this.Map.Map.GetLayer(i).Class;
//Search data
fc = cls.Search(sf);
//Buffered data
fc.Flush();
//Get The data in the query
HiMap.Carto.IFeature feat = fc.Next();
while (feat != null)
{
//Show ID field
//System.Windows.Forms.MessageBox.Show("Name: " +
feat.GetValue(cls.Fields.
FindField(Settings.POISearchField)));
if (feat.Shape.Type == GeometryType.Polyline)
{
frmList.listViewPOIs.Items.Add(new
ListViewItem(new string[]
{
feat.GetValue(cls.Fields.FindField(Settings.POISearchField)).ToString(),
((IPolyline)feat.Shape).GetPoint(0).X.ToString(),
((IPolyline)feat.Shape).GetPoint(0).Y.ToString()
}
));
}
//Go to the next data
feat = fc.Next();
}
}
frmList.ShowDialog();
}
}
}
|
If you want to use ToolInfo Class Tools, do the following code, then you can use the left mouse button to
click _mapControl control query information。
|
if (_mapControl != null)
{
ITool toolInfo = new ToolInfoClass();
toolInfo.OnCreate(this._mapControl);
this._mapControl.CurTool = toolInfo;
}
|
1.Summary
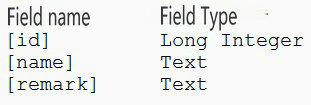
This article will show you how to gradually increase the point to point layer file (shape file).
2.Detail
First, a point layer, and load it. Note: The the layers point here is created by third-party tools. Among them,
Dbf file table structure is as follows:
|
//1.Load point layer, and allows editing("edit=true")
IDataFactory pDataFactory = new
ShapeDataFactory("\\Storage Card\\");
//Need to use the "edit = true" parameter
IFeatureClass pFeatureClassTemp =
(IFeatureClass)pDataFactory.Open("point_
empty .shp ", true);
IFeatureLayer pFeatureLayerTemp = new
FeatureLayerClass(pFeatureClassTemp);
mapControl1.Map.AddLayer(pFeatureLayerTemp);
//2.Batch add points
//Add the points to the shape layers
//Use GetLayer (0) to obtain the layer you want to edit
IFeatureLayer pFeatureLayer =
(IFeatureLayer)this.mapControl1.Map.GetLayer(0);
//Get FeatureClass
IFeatureClass pFeatureClass =
(IFeatureClass)pFeatureLayer.Class;
//Start editing
pFeatureClass.BeginEdit();
//Batch add points
for (int i = 0; i < 5; i++)
{
//create Figure dollars (Feature)
IFeature pFeature =
pFeatureClass.CreateFeature();
//Set the value of the first field id integer type "System.DateTime.Now.Ticks";
pFeature.SetValue(0,
System.DateTime.Now.Ticks);
//Set the second field name the value string types System. DateTime. Now.Ticks.
ToString ()
pFeature.SetValue(1,
System.DateTime.Now.Ticks.ToString());
//Value of string type setting third field remark "System.DateTime.Now.ToString ()"
pFeature.SetValue(2,
System.DateTime.Now.ToString());
//Generate a point object
IPoint pPoint = new
HiMap.Geometry.PointClass();
//Set the longitude and latitude
pPoint.X = 122.3456;
pPoint.Y = 43.2324;
//set Graphics, assign its point object
pFeature.Shape = pPoint;
//Save metafile
pFeature.Save();
//Pause for one second
Thread.Sleep(1000);
}
//Unified Save
pFeatureClass.SaveEdit();
|
1.Summary
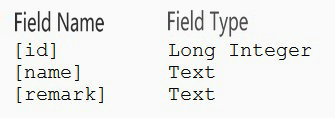
Step article describes how to delete a point from a point layer shape file data。
2.Detail
First, a point layer and load it。
Note: The the layers point here is created by third-party tools. Among them,. Dbf file table structure is as follows:
|
IFeature feature = null;
IFeatureCursor featureCursor;
IFeatureClass featureClass;
for (int i = 0; i <
this.mapControl1.Map.LayerCount; i++)
{
IFeatureLayer featureLayer =
(IFeatureLayer)this.mapControl1.Map.GetLayer(i);
// get featureClass
featureClass =
(HiMap.Carto.IFeatureClass)featureLayer.Class;
//Query data
IQueryFilter queryFilter = new
QueryFilterClass();
//Set the search criteria
queryFilter.WhereClause = new
StringBuilder("Id = 1");
featureCursor =
featureClass.Search(queryFilter);
//Navigate to the query to the diagram elements
feature = featureCursor.Next();
if (feature != null)
//Open the Edit
featureClass.BeginEdit();
featureClass.DeleteFeature(feature);
//Finish editing and save results
featureClass.SaveEdit();
}
}
|
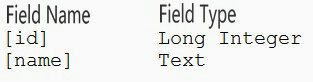
1.Summary
This article step-by-step on how to edit the segment in the polygon layer pixel value and graphics。
2.Detail
First, prepare a layer, and it is loaded。
Note: The layers used here were created by third-party tools. Among them,. Dbf file table structure is as follows:
1.Modify property value
|
//Get the layer you want to edit
IFeatureLayer pFeatureLayer = (IFeatureLayer)mapControl1.Map.GetLayer(0);
//定义FeatureClass
IFeatureClass pFeatureClass = (IFeatureClass)pFeatureLayer.Class;
//Open the Edit
pFeatureClass.BeginEdit();
//Create a query object
IQueryFilter pQueryFilter=new QueryFilterClass();
//Set the search criteria
pQueryFilter.WhereClause=new StringBuilder("Id = 1");
//Query data
IFeatureCursor pFeatureCursor = pFeatureClass.Search(pQueryFilter);
//get Metadata
IFeature pFeature = pFeatureCursor.Next();
if (pFeature != null)
{
//Modify property value
pFeature.SetValue(pFeatureClass.Fields.FindField("Name"), "test value");
//Save
pFeature.Save();
}
//Finish editing,Batch saved
pFeatureClass.SaveEdit();
|
2. Modify primitive graphics
|
//Get To modify elements where layers
IFeatureLayer pFeatureLayer = (IFeatureLayer)mapControl1.Map.GetLayer(0);
//Create FeatureClass
IFeatureClass pFeatureClass = (IFeatureClass)pFeatureLayer.Class;
//Open the Edit
pFeatureClass.BeginEdit();
//Create querier
IQueryFilter pQueryFilter=new QueryFilterClass();
//Set the search criteria
pQueryFilter.WhereClause=new StringBuilder("Id = 1");
//Query data
IFeatureCursor pFeatureCursor = pFeatureClass.Search(pQueryFilter);
//Get to query the data
IFeature pFeature = pFeatureCursor.Next();
if (pFeature != null)
{
//So use IPolygon interface to get the graphics layer type for the polyline
HiMap.Geometry.IPolyline polyline = (HiMap.Geometry.IPolyline)pFeature.Shape;
IPointCollection pPointCollection = (IPointCollection)polyline;
//Analog data to create some points
IPoint pPoint1 = new PointClass();
pPoint1.X = "111.2345556";
pPoint1.Y = "23.2345556";
IPoint pPoint2 = new PointClass();
pPoint2.X = "112.2345556";
pPoint2.Y = "23.3345556";
//Add points to segment
pPointCollection.AddPoint(pPoint1);
pPointCollection.AddPoint(pPoint2);
//To set new graphics element you want to modify
pFeature.Shape = (IGeometry)polyline;
//Save
pFeature.Save();
}
//finish Editing, batch saved
pFeatureClass.SaveEdit();
|
3.Add a new segment to the polygon (polygon) Figure yuan
|
//Layer you want to edit
IFeatureLayer pFeatureLayer = (IFeatureLayer)mapControl1.Map.GetLayer(0);
IFeatureClass pFeatureClass = (IFeatureClass)pFeatureLayer.Class;
//Open the Edit
pFeatureClass.BeginEdit();
//Create querier
IQueryFilter pQueryFilter=new QueryFilterClass();
//Set the search criteria
pQueryFilter.WhereClause=new StringBuilder("Id = 1");
//Query data
IFeatureCursor pFeatureCursor = pFeatureClass.Search(pQueryFilter);
//Query metadata
IFeature pFeature = pFeatureCursor.Next();
if (pFeature != null)
{
//So Use IPolygon interface to get the graphics layer type for the polyline
HiMap.Geometry.IPolyline polyline = (HiMap.Geometry.IPolyline)pFeature.Shape;
//Create a new line segment
IPointCollection pPointCollection = new PolylineClass();
//Using test data to create some points
IPoint pPoint1 = new PointClass();
pPoint1.X = "111.2345556";
pPoint1.Y = "23.2345556";
IPoint pPoint2 = new PointClass();
pPoint2.X = "112.2345556";
pPoint2.Y = "23.3345556";
//Points are added to the new segment
pPointCollection.AddPoint(pPoint1);
pPointCollection.AddPoint(pPoint2);
HiMap.Geometry.IGeometryCollection pGeometryCollection =
(HiMap.Geometry.IGeometryCollection)polyline;
//New segment is added to the original polygon
pGeometryCollection.AddGeometry((IGeometry)pPointCollection);
//New graphics for the element you want to change settings
pFeature.Shape = (IGeometry)polyline;
//Save this graph
pFeature.Save();
}
//finish editing, batch save
pFeatureClass.SaveEdit();
|
1. Loaded directly
|
//Defining Data Engineering, pointing to a layer file
HiMap.Driver.IDataFactory pDataFactory =
new HiMap.Driver.Shape.ShapeDataFactory("\\Storage Card\\maps\\");
//If MapControl control does not contain any Map object, create a Map object
if (mapControl1.Map == null)
{
HiMap.Carto.Map map = new HiMap.Carto.Map("test");
mapControl1.Map = map;
}
HiMap.Carto.IFeatureClass pFeatureClass =
(HiMap.Carto.IFeatureClass)pDataFactory.Open("one.shp",true);
HiMap.Carto.IFeatureLayer pFeatureLayer =
new HiMap.Carto.FeatureLayerClass(pFeatureClass);
mapControl1.Map.AddLayer(pFeatureLayer);
mapControl1.MapRefresh();
|
2.Use the drawing file is loaded map
|
Map map = new Map("test");
mapControl1.Map = map;
mapControl1.FromKmd(@"\Storage Card\maps\maps.xml")
|
1.Summary
This article step-by-step on how to load dynamic layers and graphic elements to add dynamic layers。
2.Preview

3.Detail
Add a 3 element were added to the three dynamic layers。
|
Map map = this._mapControl.Map;
for (int i = map.LayerCount - 1; i >= 0; i--)
{
if (map.GetLayer(i).Name == "traceline" ||
map.GetLayer(i).Name
== "tracepoint1" || map.GetLayer(i).Name == "tracepoint2")
{
map.RemoveAtLayer(i);
}
}
List fields = new List();
MemoryFeatureClassField mfcf = new
MemoryFeatureClassField();
mfcf.FieldName = "id";
mfcf.FieldType = MemoryFeatureClassFieldType.Int;
mfcf.FieldLength = 4;
mfcf.FieldDecimals = 0;
fields.Add(mfcf);
mfcf = new MemoryFeatureClassField();
mfcf.FieldName = "name";
mfcf.FieldType =
MemoryFeatureClassFieldType.String;
mfcf.FieldLength = 50;
mfcf.FieldDecimals = 0;
fields.Add(mfcf);
//Creating dynamic layers
IFeatureClass lineclass = new
MemoryFeatureClassClass("traceline", 10,
GeometryType.Polyline, fields);
IFeatureLayer layer = new
FeatureLayerClass(lineclass);
//layer.FeatureLayerAuto = true;
map.AddLayer(layer);
IFeatureLayerSimpleRender Render =
new HiMap.Carto.Render.FeatureLayerSimpleRenderClass();
Render.PolylineStyle.SetLineSymbolWidth(0, 3);
Render.PolylineStyle.SetLineSymbolColor(0,
Color.Red);
layer.Render = Render;
//analog track the route
IPolyline line = new PolylineClass();
//analog track the point
IPoint pnt;
//Point 1
pnt = new PointClass();
pnt.X = -74.0467566;
pnt.Y = 40.83343789;
line.AddPoint(pnt);
//Point 2
pnt = new PointClass();
pnt.X = -74.0506850;
pnt.Y = 40.78891604;
line.AddPoint(pnt);
//Point 3
pnt = new PointClass();
pnt.X = -74.0279483;
pnt.Y = 40.79415390;
line.AddPoint(pnt);
//Point 4
pnt = new PointClass();
pnt.X = -73.9837232;
pnt.Y = 40.78171397;
line.AddPoint(pnt);
IFeature ft = lineclass.CreateFeature();
ft.SetValue(0, 1);
ft.SetValue(1, "track");
ft.Shape = line;
ft.Save();
//Create temporary points"Orgin"
IFeatureClass pointclass =
new MemoryFeatureClassClass("tracepoint1", 1, GeometryType.Point, fields);
IFeatureLayer layer1 = new
FeatureLayerClass(pointclass);
map.AddLayer(layer1);
IFeatureLayerSimpleRender simplerender =
(IFeatureLayerSimpleRender)layer1.Render;
simplerender.PointStyle.SetSymbol(0, new
PointSymbolBmpClass(new StringBuilder
("\\Storage Card\\BmpStyle\\101.bmp")));
layer1.LableFieldIndex = 1;
pointclass.BeginEdit();
ft = pointclass.CreateFeature();
ft.SetValue(0, "0");
ft.SetValue(1, "Origin");
ft.Shape = line.GetPoint(0);
ft.Save();
pointclass.SaveEdit();
//Create temporary points"Destination"
IFeatureClass pointclass2 =
new MemoryFeatureClassClass("tracepoint2", 1,
GeometryType.Point, fields);
IFeatureLayer layer2 = new
FeatureLayerClass(pointclass2);
//layer.FeatureLayerAuto = true;
map.AddLayer(layer2);
simplerender =
(IFeatureLayerSimpleRender)layer2.Render;
simplerender.PointStyle.SetSymbol(0, new
PointSymbolBmpClass
(new
StringBuilder("\\Storage Card\\BmpStyle\\102.bmp")));
layer2.LableFieldIndex = 1;
pointclass2.BeginEdit();
IFeature ftPoint2 = pointclass2.CreateFeature();
ftPoint2.SetValue(0, "0");
ftPoint2.SetValue(1, "Destination");
ftPoint2.Shape = line.GetPoint(line.PointCount -
1);
ftPoint2.Save();
pointclass2.SaveEdit();
double xMin = 0, yMin = 0, xMax = 0, yMax = 0;
for (int i = 0; i < line.PointCount; i++)
{
IPoint p = line.GetPoint(i);
if (i == 0)
{
xMin = p.X;
yMin = p.Y;
xMax = p.X;
yMax = p.Y;
}
else
{
if (p.X < xMin)
xMin = p.X;
if (p.X > xMax)
xMax = p.X;
if (p.Y < yMin)
yMin = p.Y;
if (p.Y > yMax)
yMax = p.Y;
}
}
IPoint pt = new PointClass();
pt.X = (xMax + xMin) / 2;
pt.Y = (yMax + yMin) / 2;
double scale = 0;
if (Math.Abs(xMax - xMin) > Math.Abs(yMax - yMin))
{
scale = (xMax - xMin) /
(this._mapControl.Map.Envelope.MaxX - this._mapControl.
Map.Envelope.MinX) * 1.5;
}
else
{
scale = (yMax - yMin) /
(this._mapControl.Map.Envelope.MaxY
-
this._mapControl.Map.Envelope.MinY) * 1.5;
}
this._mapControl.Map.CenterAt = pt;
this._mapControl.Map.MapScale = this._mapControl.Map.MapScale *
scale;
this._mapControl.MapRefresh();
|
1.Summary
This article step-by-step on how to display different styles in the same layer, ie grouping rendering capabilities.。
2.Preview
3.Detail
|
use .NET code to display the different styles in the same layer。
for (int i = 0;
i < this._mapControl.Map.LayerCount; i++)
{
if (this._mapControl.Map.GetLayer(i).Caption.ToLower() ==
"nyc_mainroads")
{
IFeatureLayer lyr = (IFeatureLayer)this._mapControl.Map.GetLayer(i);
IFeatureLayerGroupRender Render =
new HiMap.Carto.Render.FeatureLayerGroupRenderClass(lyr, "HWYNAME");
Render.DefaultPolylineStyle = new HiMap.Carto.PolylineStyleClass(1);
Render.AddGroupValue(new StringBuilder("CONVENT AVE"));
Render.AddGroupValue(new StringBuilder("ADAM CLAYTON POWELL JR BLVD"));
IPolylineStyle LineStyle = new HiMap.Carto.PolylineStyleClass(1);
LineStyle.SetLineSymbolColor(1, Color.FromArgb(255, 0, 0));
LineStyle.SetLineSymbolWidth(1, 10);
Render.SetPolylineStyle(new StringBuilder("CONVENT AVE"), LineStyle);
LineStyle = new HiMap.Carto.PolylineStyleClass(1);
LineStyle.SetLineSymbolColor(1, Color.FromArgb(0, 0, 255));
LineStyle.SetLineSymbolWidth(1, 5);
Render.SetPolylineStyle(new StringBuilder("ADAM CLAYTON POWELL JR
BLVD"),
LineStyle);
IFeatureClass fclass = (IFeatureClass)lyr.Class;
IQueryFilter qf = new QueryFilterClass();
qf.WhereClause = new StringBuilder("HWYNAME =
'CONVENT AVE' or HWYNAME = 'ADAM
CLAYTON POWELL JR BLVD'");
IFeatureCursor fcurosr = fclass.Search(qf);
IFeature feature = fcurosr.Next();
IEnvelope envlope = new EnvelopeClass();
while (feature != null)
{
if (feature.Shape.Type == GeometryType.Polyline)
{
IPolyline polyline = (IPolyline)feature.Shape;
this._mapControl.Map.CenterAt = polyline.GetPoint(0);
break;
}
}
lyr.Render = Render;
this._mapControl.MapRefresh();
break;
}
}
|
1.Summary
This article step-by-step on how to change the dimension text style。
2.Preview

3.Detail
Use .NET code to change the label's font size
|
for (int i = 0; i < this.mapControl1.Map.LayerCount; i++)
{
if (this.mapControl1.Map.GetLayer(i).Caption.ToLower() ==
"nyc_mainroads")
{
IFeatureLayer lyr = (IFeatureLayer)this.mapControl1.Map.GetLayer(i);
//Set the font size to 16 pixels
lyr.LabelFontSize = 16;
//Do not display duplicate labels
lyr.FeatureLayerIsAllowSameLabel = false;
break; ;
}
}
//Refresh Map
mapControl1.MapRefresh();
|
1.Summary
Priority-step article describes how to change the label (weight)。
2.Preview
3.Detail
Of the different picture display nyc main roads layer marked "CATHEDRALPKWY higher priority than the priority
of the" Central Park larger the priority, the greater the possibility of being displayed。
Use .NET code defines the priority label。
|
for (int i = 0; i <
this.mapControl1.Map.LayerCount; i++)
{
if
(this.mapControl1.Map.GetLayer(i).Caption.ToLower() == "nyc_mainroads")
{
IFeatureLayer lyr =
(IFeatureLayer)this.mapControl1.Map.GetLayer(i);
//Do not repeat marked
lyr.FeatureLayerIsAllowSameLabel = false;
//Set marked priority 1
lyr.LabelLevel = 1;
break;
}
}
//Refresh Map
mapControl1.MapRefresh();
|
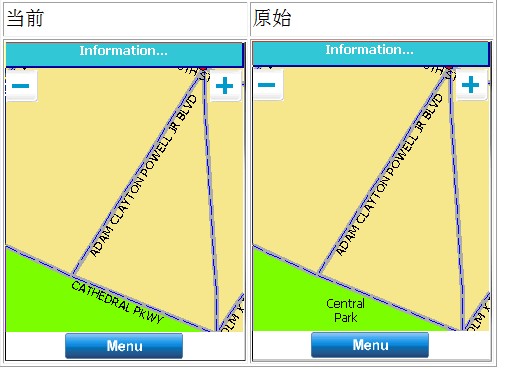
1.Summary
This article will gradually about how to change the arrangement of the dimension text style。
2.Preview
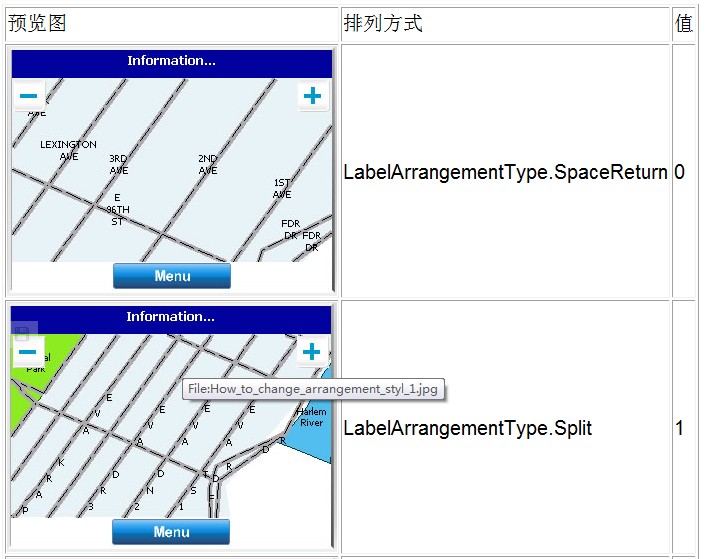

3.Detail
Use NET code to set label arrangement。
|
for (int i = 0; i <
this.mapControl1.Map.LayerCount; i++)
{
if
(this.mapControl1.Map.GetLayer(i).Caption.ToLower() == "nyc_mainroads")
{
IFeatureLayer lyr =
(IFeatureLayer)this.mapControl1.Map.GetLayer(i);
//Do not repeat marked
lyr.FeatureLayerIsAllowSameLabel = false;
//The set marked permutations style as "LabelArrangementType.Along";
lyr.LabelArrangementType =
LabelArrangementType.Along;
break;
}
}
//Refresh Map
mapControl1.MapRefresh();
|
1.Summary
This article step-by-step on how to create a picture style symbol.
2.Preview
3.Detail
image tag style Please use Window bitmap (BMP) files。
|
for (int i = 0; i <
this.mapControl1.Map.LayerCount; i++)
{
if (this.mapControl1.Map.GetLayer(i).Caption.ToLower() ==
"nyc_pois")
{
//Find Layers
IFeatureLayer lyr =
(IFeatureLayer)this.mapControl1.Map.GetLayer(i);
//lyr.Render.ToSimpleRender();
//Set the picture marks
HiMap.Carto.Render.IFeatureLayerSimpleRender render =
new HiMap.Carto.Render.FeatureLayerSimpleRenderClass();
render.PointStyle.SetSymbol(0, new PointSymbolBmpClass
(new StringBuilder("\\Storage Card\\BmpStyle\\101.bmp")));
lyr.Render = render;
this.mapControl1.MapRefresh();
break;
}
}
|
1.Summary
This article step-by-step description of how to create a line style symbol。
2.Preview

3.Detail
Use .NET code setting line style。
|
for (int i = 0; i <
this.mapControl1.Map.LayerCount; i++)
{
//Find layers
if (this.mapControl1.Map.GetLayer(i).Caption.ToLower() ==
"nyc_mainroads")
{
IFeatureLayer lyr =
(IFeatureLayer)this.mapControl1.Map.GetLayer(i);
//Set the line style
HiMap.Carto.Render.IFeatureLayerSimpleRender Render
=
(HiMap.Carto.Render.IFeatureLayerSimpleRender)lyr.Render;
//Change the line style 0 style 4 pixel
Render.PolylineStyle.SetLineSymbolWidth(0, 4);
//Change the line style 0 style in blue
Render.PolylineStyle.SetLineSymbolColor(0,
Color.Blue);
mapControl1.MapRefresh();
break;
}
}
|
1.Summary
This article describes how to refresh and make the graphics display area is invalid。
2.Detail
|
//Redraw the display area
mapControl1.MapRefresh();
|
1. Specify a point to be positioned
|
//Create a point
IPoint pPoint = new PointClass();
pPoint.X = "111.2345556";
pPoint.Y = "23.2345556";
//Set the center of the map to the point
mapControl.Map.CenterAt = pPoint;
//Refresh Map
mapControl.MapRefresh();
|
2. Specify a region to locate
|
//Defined area
IEnvelope pEnvelope = new EnvelopeClass();
pEnvelope.MinX = 123.38160821744314;
pEnvelope.MaxX = 123.41495323446499;
pEnvelope.MinY = 41.798595643189344;
pEnvelope.MaxY = 41.835755556226417;
//Set the map display area
mapControl.Map.Envelope = pEnvelope;
//Refresh Map
mapControl.MapRefresh();
|
1.Summary
This article step-by-step on how to load dynamic layers and graphic elements to add dynamic layers。
2.Preview
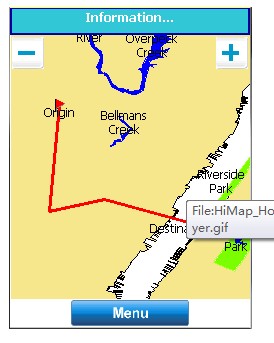
3.Detail
add three primitives were added to the three dynamic layers
|
Map map = this._mapControl.Map;
for (int i = map.LayerCount - 1; i >= 0; i--)
{
if (map.GetLayer(i).Name == "traceline" || map.GetLayer(i).Name
== "tracepoint1" || map.GetLayer(i).Name == "tracepoint2")
{
map.RemoveAtLayer(i);
}
}
List fields = new List();
MemoryFeatureClassField mfcf = new MemoryFeatureClassField();
mfcf.FieldName = "id";
mfcf.FieldType = MemoryFeatureClassFieldType.Int;
mfcf.FieldLength = 4;
mfcf.FieldDecimals = 0;
fields.Add(mfcf);
mfcf = new MemoryFeatureClassField();
mfcf.FieldName = "name";
mfcf.FieldType = MemoryFeatureClassFieldType.String;
mfcf.FieldLength = 50;
mfcf.FieldDecimals = 0;
fields.Add(mfcf);
//Creating dynamic layers
IFeatureClass lineclass = new MemoryFeatureClassClass("traceline",
10, GeometryType.Polyline, fields);
IFeatureLayer layer = new FeatureLayerClass(lineclass);
//layer.FeatureLayerAuto = true;
IFeatureLayerSimpleRender Render = map.AddLayer(layer);
Render.PolylineStyle.SetLineSymbolWidth(0, 3);
Render.PolylineStyle.SetLineSymbolColor(0, Color.Red);
layer.Render = Render;
//analog track the route
IPolyline line = new PolylineClass();
//analog track the point
IPoint pnt;
//point 1
pnt = new PointClass();
pnt.X = -74.0467566;
pnt.Y = 40.83343789;
line.AddPoint(pnt);
//point 2
pnt = new PointClass();
pnt.X = -74.0506850;
pnt.Y = 40.78891604;
line.AddPoint(pnt);
//point 3
pnt = new PointClass();
pnt.X = -74.0279483;
pnt.Y = 40.79415390;
line.AddPoint(pnt);
//point 4
pnt = new PointClass();
pnt.X = -73.9837232;
pnt.Y = 40.78171397;
line.AddPoint(pnt);
IFeature ft = lineclass.CreateFeature();
ft.SetValue(0, 1);
ft.SetValue(1, "track
ft.Shape = line;
ft.Save();
//Create temporary points"Orgin"
IFeatureClass pointclass =
new MemoryFeatureClassClass("tracepoint1", 1, GeometryType.Point, fields);
IFeatureLayer layer1 = new FeatureLayerClass(pointclass);
map.AddLayer(layer1);
IFeatureLayerSimpleRender M simplerender
=
(IFeatureLayerSimpleRender)layer1.Render
;
simplerender.PointStyle.SetSymbol(0, new PointSymbolB
mpClass(new StringBuilder("\\Storage
Card\\BmpStyle\\101.bmp")));
layer1.LableFieldIndex = 1;
pointclass.BeginEdit();
ft = pointclass.CreateFeature();
ft.SetValue(0, "0")
ft.SetValue(1, "Origin");
ft.Shape = line.GetPoint(0);
ft.Save();
pointclass.SaveEdit();
//Create temporary points"Destination"
IFeatureClass pointclass2 = new MemoryFeatureClassClass
("tracepoint2", 1, GeometryType.Point,
fields);
IFeatureLayer layer2 = new FeatureLayerClass(pointclass2);
//layer.FeatureLayerAuto = true;
map.AddLayer(layer2);
simplerender = (IFeatureLayerSimpleRender)layer2.Render;
simplerender.PointStyle.SetSymbol(0, new PointSymbolBmpClass
(new StringBuilder("\\Storage Card\\BmpStyle\\102.bmp")));
layer2.LableFieldIndex = 1;
pointclass2.BeginEdit();
IFeature ftPoint2 = pointclass2.CreateFeature();
ftPoint2.SetValue(0, "0");
ftPoint2.SetValue(1, "Destination");
ftPoint2.Shape = line.GetPoint(line.PointCount - 1);
ftPoint2.Save();
pointclass2.SaveEdit();
double xMin = 0, yMin = 0, xMax = 0, yMax = 0;
for (int i = 0; i < line.PointCount; i++)
{
IPoint p = line.GetPoint(i);
if (i == 0)
{
xMin = p.X;
yMin = p.Y;
xMax = p.X;
yMax = p.Y;
}
else
{
if (p.X < xMin)
xMin = p.X;
if (p.X > xMax)
xMax = p.X;
if (p.Y < yMin)
yMin = p.Y;
if (p.Y > yMax)
yMax = p.Y;
}
}
IPoint pt = new PointClass();
pt.X = (xMax + xMin) / 2;
pt.Y = (yMax + yMin) / 2;
double scale = 0;
if (Math.Abs(xMax - xMin) > Math.Abs(yMax - yMin))
{
scale = (xMax - xMin) / (this._mapControl.Map.Envelope.MaxX -
this._mapControl.Map.Envelope.MinX) * 1.5;
}
else
{
scale = (yMax - yMin) / (this._mapControl.Map.Envelope.MaxY -
this._mapControl.Map.Envelope.MinY) * 1.5;
}
this._mapControl.Map.CenterAt = pt;
this._mapControl.Map.MapScale = this._mapControl.
Map.MapScale * scale;
this._mapControl.MapRefresh();
|
1.Summary
This article will step-by-step on how to flash the diagram elements。
2.Preview

3.Detail
|
IFeature ift = null;
IFeatureCursor ifc;
IFeatureClass cls;
string strKeyword = "CATH";
List list = new List();
for (int i = 0; i <
this._mapControl.Map.LayerCount; i++)
{
//get FeatureClass
cls =
(HiMap.Carto.IFeatureClass)this._mapControl.Map.GetLayer(i).Class;
ifc = GetFeatureCursor(_mapControl, i,
Settings.POISearchField +
" like '" + strKeyword + "%'");
list.Add(ifc);
//Navigate to the primitive
ift = ifc.Next();
if (ift != null && ift.Shape.Type ==
GeometryType.Polyline)
{
IPolyline line = ((IPolyline)ift.Shape);
double xMin = 0, yMin = 0, xMax = 0, yMax = 0;
for (int j = 0; j < line.PointCount; j++)
{
IPoint p = line.GetPoint(j);
if (j == 0)
{
xMin = p.X;
yMin = p.Y;
xMax = p.X;
yMax = p.Y;
}
else
{
if (p.X < xMin)
xMin = p.X;
if (p.X > xMax)
xMax = p.X;
if (p.Y < yMin)
yMin = p.Y;
if (p.Y > yMax)
yMax = p.Y;
}
}
IPoint pt = new PointClass();
pt.X = (xMax + xMin) / 2;
pt.Y = (yMax + yMin) / 2;
double scale = 0;
if (Math.Abs(xMax - xMin) >
Math.Abs(yMax - yMin))
{
scale = (xMax - xMin +
Math.Abs(this._mapControl.PointToMapPoint(64, 0).X
- this._mapControl.PointToMapPoint(0,
0).X)) /
(this._mapControl.Map.Envelope.MaxX
-this._mapControl.Map.Envelope.MinX);
}
else
{
scale = (yMax - yMin +
Math.Abs(this._mapControl.PointToMapPoint(0, 64).Y
- this._mapControl.PointToMapPoint(0,
0).Y)) / (this._mapControl.Map.Envelope.MaxY -
this._mapControl.Map.Envelope.MinY);
}
this._mapControl.Map.CenterAt = pt;
this._mapControl.Map.MapScale =
this._mapControl.Map.MapScale * scale;
this._mapControl.MapRefresh();
list.Add(ifc);
}
}
this._mapControl.Flash(list, Color.Red, 10, 500);
|
Case:
|
MessageBox.Show("Longitude:" + this.mapControl.Map.CenterAt.X.ToString()
+
" ;\r\nLatitude:" +
this.mapControl.Map.CenterAt.Y.ToString());
|
Case:
|
MessageBox.Show("Scale = 1:" + mapControl1.Map.ScaleRuler.ToString());
|
Case:
|
private void menuItemRanging_Click(object sender,
EventArgs e)
{
//Parameter:
//Point 1 Longitude: 123.4567
//Point 1 Latitude: 41.3456
//Point 2 Longitude: 124.4567
//Point 2 Latitude: 41.3457
double distance =
HiMap.CoordinateSystem.CoordinateSystemClass.Distance
(123.4567,41.3456, 124.3456, 42.3457);
MessageBox.Show(distance.ToString());
}
|
Case:
|
if (this.mapControl.Map != null)
{
ICommand pCommand = new
CommandBeforeView();
pCommand.OnCreate(this.mapControl);
pCommand.OnClick();
}
|
Case:
|
if (this.mapControl.Map != null)
{
ICommand pCommand = new CommandAfterView();
pCommand.OnCreate(this.mapControl);
pCommand.OnClick();
}
|
Case:
|
private void menuItemPan_Click(object sender, EventArgs e)
{
ITool tool = new HiMap.MapControls.Tools.ToolPan();
tool.OnCreate(this.mapControl1);
this.mapControl1.CurTool = tool;
}
|
Case:
|
private void menuItemFullExtent_Click(object sender, EventArgs e)
{
if (this.mapControl.Map != null)
{
mapControl.Map.Envelope = mapControl.Map.FullEnvelope;
mapControl.MapRefresh();
}
}
------------------------------------------------------------------------
private void menuItemFullExtent_Click(object sender, EventArgs e)
{
ICommand cmd = new HiMap.MapControls.Tools.CommandFullMap();
cmd.OnCreate(this.mapControl1);
cmd.OnClick();
}
|
Case:
|
private void menuItemZoomOut_Click(object
sender, EventArgs e)
{
ITool tool = new
HiMap.MapControls.Tools.ToolZoomOut();
tool.OnCreate(this.mapControl1);
this.mapControl1.CurTool = tool;
}
|
Case:
|
private void menuItemZoomIn_Click(object
sender, EventArgs e)
{
ITool tool = new
HiMap.MapControls.Tools.ToolZoomIn();
tool.OnCreate(this.mapControl1);
this.mapControl1.CurTool = tool;
}
|
Case:
|
Map map = new Map("test");
mapControl.Map = map;
mapControl.Map.FromKmd("\\Storage
Card\\maps\\maps.xml");
|
Summary:
This article will describe the steps necessary to use Map coordinate transformation。
Place your map converted into HiMap the own format, display speed is very fast.
Video download: the [HiMap speed test - loading large amount of data, vector map]
code download : [HiMap_gsf_ example code vs2005 & vs2008]
This video displays the the speed vector map of the large amount of data in HiMap operation, we will
be shp files conversion became HiMap the the own format(.gsf Format), and then loads, very fast.
The original size of the test map file is: 79.5 MB, 188
MB, and 1.95 MB, Total: 270 MB.
After HiMap conversion the total gsf map file size: 398 MB (which test_file.gsf: 204 MB test_file.kdb: 188 MB
test_file.kpi: 5.37 MB)
can not find the platform to find the directory. Csproj file " 4118C335-430C-497f-BE48-11C3316B135E "
sentence should read " 3C41C503-53EF-4c2a-8DD4-A8217CAD115E "you can run.
Unable to find the PInvoke DLL KMGisLib the please gdalce.dll KMGisLib.dll copied to the mobile device or emulator
program directory, for example: \ Program Files \ myHiMap \ KMGisLib.dll
1.Can not find the map file, check the map file path.
2.This vision has not been included in the the Layer Settings scaling within。
|
|
|


 First
First